A Guide to Identifying Faulty Vehicle Connectors and Replacing Them – Professional B2B Guide (2026)

Intro: 45% of High‑Voltage Connector Failures Could Be Prevented – Don’t Let a Small Connector Disable a Vehicle
Studies show that nearly 45% of high‑voltage connector failures lead to electrical system malfunctions, affecting critical safety features such as lights, airbags, and ADAS. Environmental factors – water exposure, temperature extremes, vibration – gradually degrade connectors. Identifying and replacing faulty connectors early prevents costly repairs, reduces downtime, and keeps vehicles safe.
This guide covers:
How to spot faulty connectors (visual signs, electrical symptoms)
Tools needed for diagnosis
Common auto wire connector types
Safety precautions and step‑by‑step replacement procedure
Maintenance tips to prevent future failures
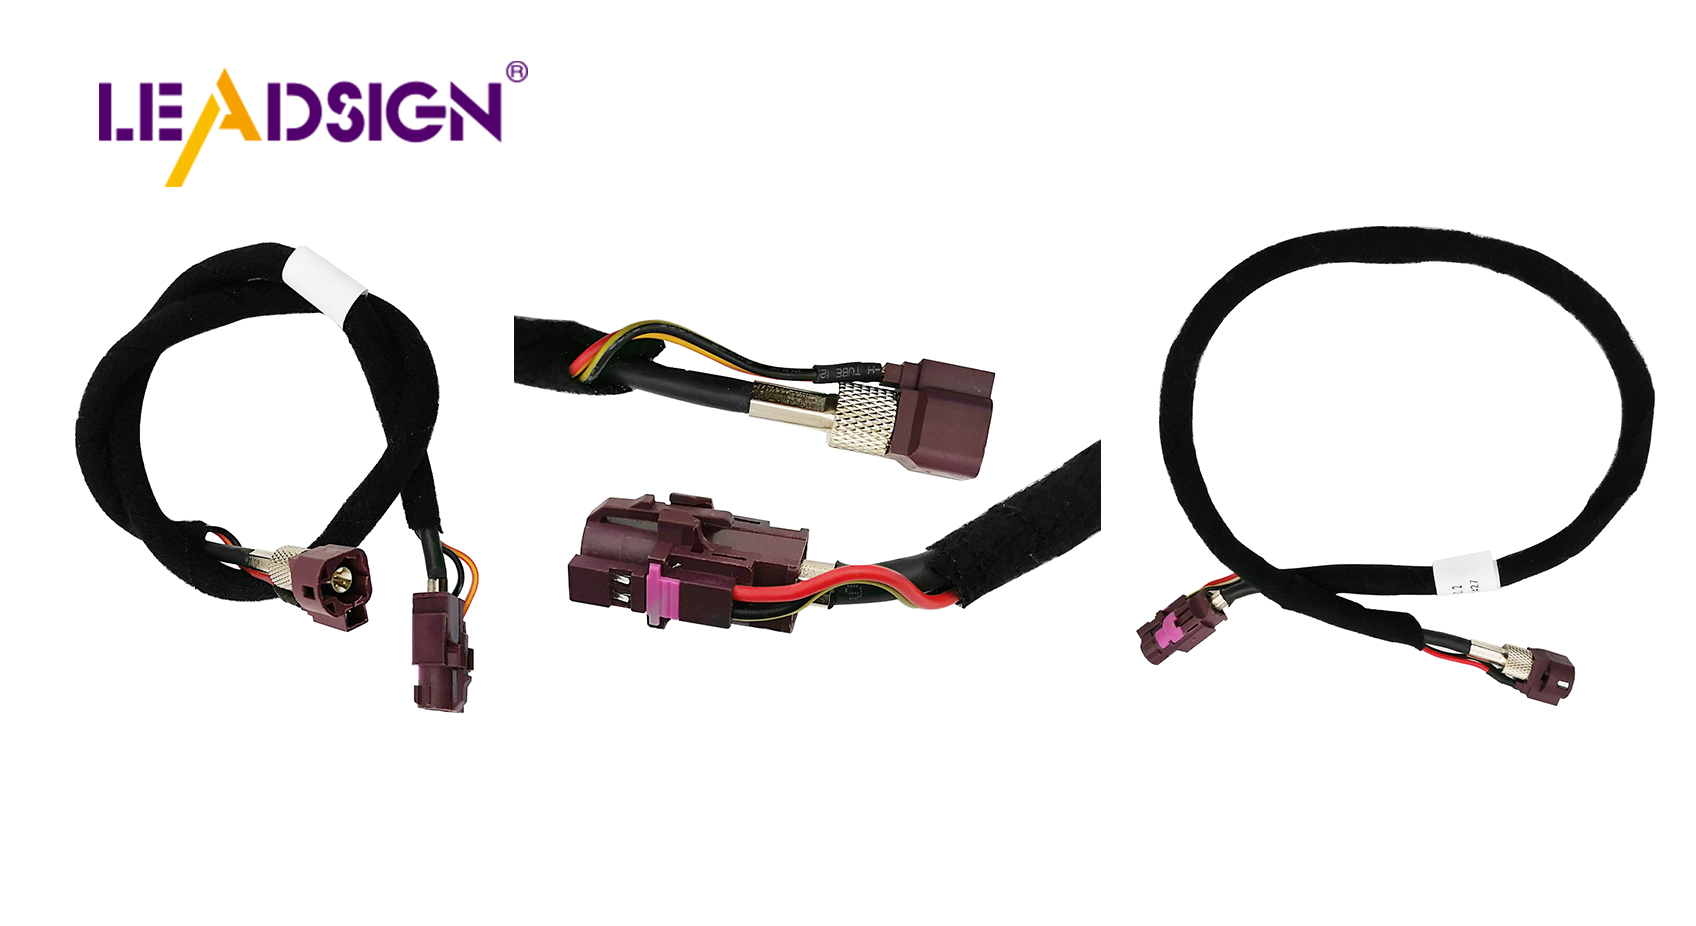
Why LEADSIGN pre‑terminated FAKRA/HSD cables simplify data connector replacement
1. How to Spot Faulty Vehicle Connectors – Common Signs
Symptom | Likely cause | Visual / electrical clue |
|---|---|---|
Intermittent operation (flickering lights, intermittent sensor) | Loose terminal, corrosion, fretting | Connector wiggles; green/white powder on pins |
No power / dead circuit | Broken wire, melted connector, pushed‑back pin | Burnt smell, melted plastic, missing pin |
Overheating / melted housing | High resistance (corrosion or loose crimp) | Discoloured plastic, burnt odour |
Corrosion (green/white powder) | Water ingress, unsealed connector | Visible powder on terminals |
Bent or broken pins | Forced mismating, physical damage | Misaligned or missing pins |
Pro tip: Use a multimeter – measure continuity (should beep) and voltage drop (should be <0.2V for power circuits).
2. Tools You Need to Diagnose and Replace Connectors
Tool | Purpose |
|---|---|
Multimeter (digital, auto‑ranging) | Continuity, voltage drop, resistance testing |
Test light | Quick power check (simple circuits) |
Inspection tools (flashlight, magnifying glass) | Visual inspection for cracks, corrosion, bent pins |
Wire strippers | Removing insulation without nicking strands |
Ratcheting crimper (with interchangeable dies) | Installing new crimp terminals |
Depinning tool | Removing terminals from connector housing |
Heat gun | Shrinking heat‑shrink tubing for waterproof splices |
Diagnostic breakout leads (for advanced troubleshooting) | Accessing hard‑to‑reach circuits |
3. Types of Auto Wire Connectors Used in Replacements
Connector type | Best for | Termination method | Sealed? | Data capable? |
|---|---|---|---|---|
Crimp connectors (butt, ring, spade) | Power, ground, general repair | Crimp (ratcheting tool) | Optional (heat‑shrink) | ❌ |
Soldered connectors | Permanent low‑vibration connections | Solder | No (needs heat‑shrink) | ❌ |
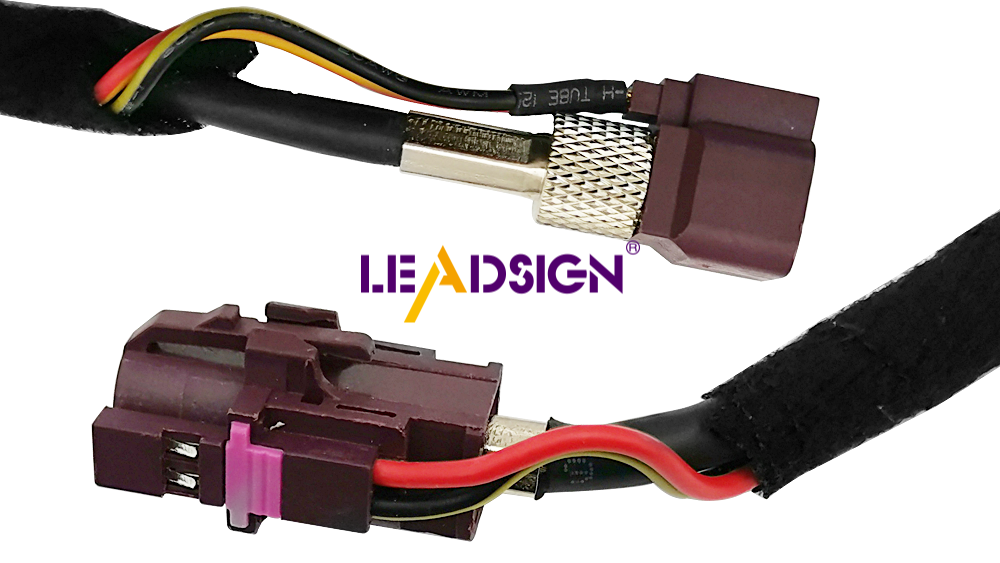
HSD connectors | USB‑C, Ethernet, LVDS | Pre‑terminated cables | Optional | ✅ 100Ω, up to 5 Gbps |
FAKRA (coaxial) | GPS, backup camera, 5G antenna | Pre‑terminated cables | IP67 optional | ✅ 50Ω, up to 20 GHz |
Recommendation for field repairs: For power circuits, use crimp connectors with adhesive‑lined heat‑shrink. For data lines (camera, GPS), replace the entire pre‑terminated FAKRA/HSD cable – never field‑crimp.
4. Safety Precautions Before Replacing Faulty Connectors
Disconnect the battery (negative terminal first) – prevents short circuits and airbag deployment.
Wear safety glasses and insulated gloves – protect against sparks, sharp wires, and hot surfaces.
Work in a dry, well‑lit area – keep flammable materials away.
For EV high‑voltage (orange) connectors – do not touch. Only certified HV technicians may service them.
5. Step‑by‑Step Replacement Procedure
✅ Step 1: Remove the Old Connector
Locate the faulty connector (visual inspection or multimeter tracing).
Release any locking tabs or secondary locks.
Use a depinning tool to remove terminals (if reusing housing) or cut the wires close to the connector.
Do not pull on wires – you may damage the harness.
✅ Step 2: Prepare Wire Ends
Strip 5‑8 mm of insulation – do not nick copper strands.
If corrosion wicks under the insulation, cut back until clean copper is visible.
Twist strands together tightly.
✅ Step 3: Install the New Connector
For power circuits | For data circuits (FAKRA/HSD) |
|---|---|
Select correct crimp terminal (match wire gauge). | Use a pre‑terminated LEADSIGN cable. |
Insert stripped wire into terminal, crimp with ratcheting crimper. | Plug the cable into the device and harness – no crimping. |
Insert terminal into housing until click. | Secure with secondary lock (if present). |
If sealed, apply dielectric grease to rubber seal. | – |
✅ Step 4: Seal and Protect
Slide adhesive‑lined heat‑shrink tubing over the repair and heat until adhesive oozes.
For exterior/underbody connectors, use IP67 sealed connectors.
✅ Step 5: Test Your Work
Reconnect battery (positive first, then negative).
Use multimeter to verify continuity and voltage drop.
Operate the circuit (light, camera, sensor) – confirm function.
6. Tips for Maintaining Vehicle Connectors – Prevent Future Failures
Maintenance task | Frequency | Action |
|---|---|---|
Visual inspection | Every 6 months | Look for corrosion, cracks, melted plastic, loose locks. |
Clean with contact cleaner | Annually or after water exposure | Spray, brush, blow dry. |
Apply dielectric grease | Annually | Squeeze onto rubber seals – not electrical contacts. |
Pull test | Every service | Gently tug wires – should not move. |
Common mistakes to avoid:
Using the wrong wire gauge terminal – causes loose or high‑resistance connection.
Forgetting the secondary lock – connector will vibrate apart.
Using unsealed connectors underbody – corrosion within months.
7. Why LEADSIGN – Pre‑Terminated FAKRA/HSD Cables Simplify Replacement
For power connectors, field repair (crimp, solder) is acceptable. For high‑speed data (GPS, camera, USB‑C, Ethernet), field termination is error‑prone and often causes impedance mismatch. LEADSIGN pre‑terminated cables eliminate this problem.
What LEADSIGN offers:
✅ FAKRA (standard & Mini) – all 14 colours, 50Ω, up to 20 GHz, IP67 optional
✅ HSD (USB‑C, Ethernet, LVDS) – 100Ω, locking, up to 5 Gbps
✅ Pre‑terminated cables – any length 0.3m – 20m, no field crimping
✅ Low‑loss, double‑shielded coax – for long runs and EV environments
✅ Bulk pricing – for shops, fleets, and distributors
For your business: When a GPS antenna or backup camera fails, replace the entire LEADSIGN pre‑terminated FAKRA cable – faster, more reliable, no signal loss.
Final Recommendations – Connector Replacement Checklist
Step | Action |
|---|---|
1 | Identify faulty connector (visual + multimeter). |
2 | Disconnect battery (negative first). |
3 | Remove old connector without damaging harness. |
4 | Strip wires (power) or use pre‑terminated cable (data). |
5 | Crimp or plug in new connector. |
6 | Seal with heat‑shrink (if power splice) or use sealed housing. |
7 | Test continuity and function. |
8 | Secure harness with zip ties (strain relief). |
Remember: A 10‑minute connector check and proper replacement can save hours of diagnostic time and prevent a dangerous failure.
Ready to simplify your connector replacements with pre‑terminated data cables?
[Request a free LEADSIGN FAKRA/HSD sample kit] | [Get bulk pricing]
See Also
Understanding Ford Fakra Connectors: A Complete Overview
Exploring Fakra Connectors Used in Honda Cars
An In-Depth Look at HSD Connectors
