DIY Guide to Car Wiring Wire for Beginners

Learning about car wiring wire is an important skill to have. It helps you fix problems, save money, and customize your car. Many people think it’s too hard to learn. But with good tools and advice, you can do it. One car fan said a $10 book helped them rewire two cars. Begin with small tasks and use good materials, including quality car wiring wire. This ensures your work lasts and functions well in tough situations.
Key Takeaways
Start small: Begin with simple wiring tasks to build your confidence and skills before tackling more complex projects.
Choose the right wire: Understand the different types of automotive wires (GXL, SXL, TXL) and select the appropriate one based on your project's heat, space, and strength requirements.
Use quality tools: Invest in essential tools like wire strippers, crimpers, and multimeters to ensure safe and effective wiring connections.
Plan your layout: Create a clear wiring plan and diagram to avoid mistakes and simplify the installation process.
Test your connections: Always use a multimeter to check voltage and continuity after completing your wiring to ensure everything functions correctly.
Protect your wires: Use heat shrink tubing and electrical tape to safeguard connections from damage and environmental factors.
Label your wires: Clearly label wires for easy identification during repairs or upgrades, saving time and reducing confusion in the future.
Understanding Automotive Wiring Basics
Learning about car wiring is important for DIY projects. This section explains the basics to help you avoid mistakes.
Types of Automotive Wires
Car wires have different types for specific uses. Knowing them helps you pick the right one.
GXL, SXL, and TXL wires: Differences and uses
GXL Wire: This wire has strong, heat-resistant insulation. It works well in engines and cold areas. Use it for flexible but tough wiring.
SXL Wire: SXL wire has thicker insulation than GXL. It handles high heat, making it great for tough engine jobs. Pick this for extra strength.
TXL Wire: TXL wire is the thinnest type. It fits in tight spaces and is lightweight. Use it for small, compact car parts.
Each wire type has a special use. Choose based on heat, space, and strength needs.
Insulation types and their importance
Insulation keeps wires safe and prevents damage. The XLPE insulation in GXL, SXL, and TXL wires resists heat and wear. This makes it perfect for cars. Always use wires with good insulation for safety and long life.
Wire Gauges and Their Applications
Wire gauge means how thick a wire is. It shows how much current it can handle.
Choosing the correct gauge for your project
Picking the right gauge is key. Thin wires can overheat, and thick ones are bulky. For example:
Use thick wires for high-power items like amplifiers.
Use thin wires for low-power items like LED lights.
Check your car manual to find the right gauge.
Common automotive wire gauge sizes
Car wires range from 8-gauge to 20-gauge. Common uses include:
8-gauge to 10-gauge: For heavy-duty tasks like batteries.
12-gauge to 14-gauge: For medium-power items like fog lights.
16-gauge to 20-gauge: For low-power items like interior lights.
Knowing these sizes helps match wires to power needs safely.
Reading Wiring Diagrams
A wiring diagram shows how car parts connect. Learning to read them makes fixing and installing easier.
Key symbols and their meanings
Diagrams use symbols for parts. Common ones are:
Lines: Show wires connecting parts.
Circles: Mark connection points.
Zigzag lines: Mean resistors.
Arrows: Show current direction or diodes.
Learning these symbols helps you understand diagrams.
How to trace circuits effectively
Tracing circuits means following electricity from start to end. Begin at the power source and ground. Follow wires step by step to find breaks or wrong connections. A simple diagram helps you see the circuit clearly.
"A wiring diagram is like a map for your car's wires. Learning it helps you fix and customize confidently.
Important Tools and Supplies
Having the right tools and supplies is very important. They help you work safely and make your wiring last longer. Let’s look at what you’ll need.
Tools for Car Wiring
Good tools make wiring easier and faster. Here are the main ones:
Wire strippers, crimpers, and multimeters
Wire Strippers: These remove the plastic cover from wires. They do this without harming the metal inside. This makes clean and strong connections.
Crimping Tools: Crimpers attach wire ends to connectors tightly. They stop wires from coming loose and help them last longer.
Multimeters: A multimeter checks voltage, current, and resistance. It helps find and fix electrical problems.
"Using good tools like strippers and crimpers keeps your wiring safe."
Heat guns and soldering irons
Heat Guns: Heat guns shrink tubing around wires. This protects them from water and damage.
Soldering Irons: Soldering irons join wires by melting solder. This makes strong and lasting connections.
These tools make your wiring projects easier and more professional.
Supplies You’ll Need
The right supplies are just as important as tools. They keep your wiring safe, neat, and long-lasting.
DIY wiring kits and connectors
DIY wiring kits make custom wiring simple. They include wires, connectors, and instructions. These kits are great for beginners and let you design wiring for your car.
Heat shrink tubing, tape, and zip ties
Heat Shrink Tubing: This covers and protects wire connections. Heat it, and it shrinks tightly around the wire.
Electrical Tape: Tape adds extra protection and holds wires in place. It’s useful for quick fixes.
Zip Ties: Zip ties keep wires neat and stop tangling. They bundle wires together nicely.
These supplies keep your wiring safe and working well.
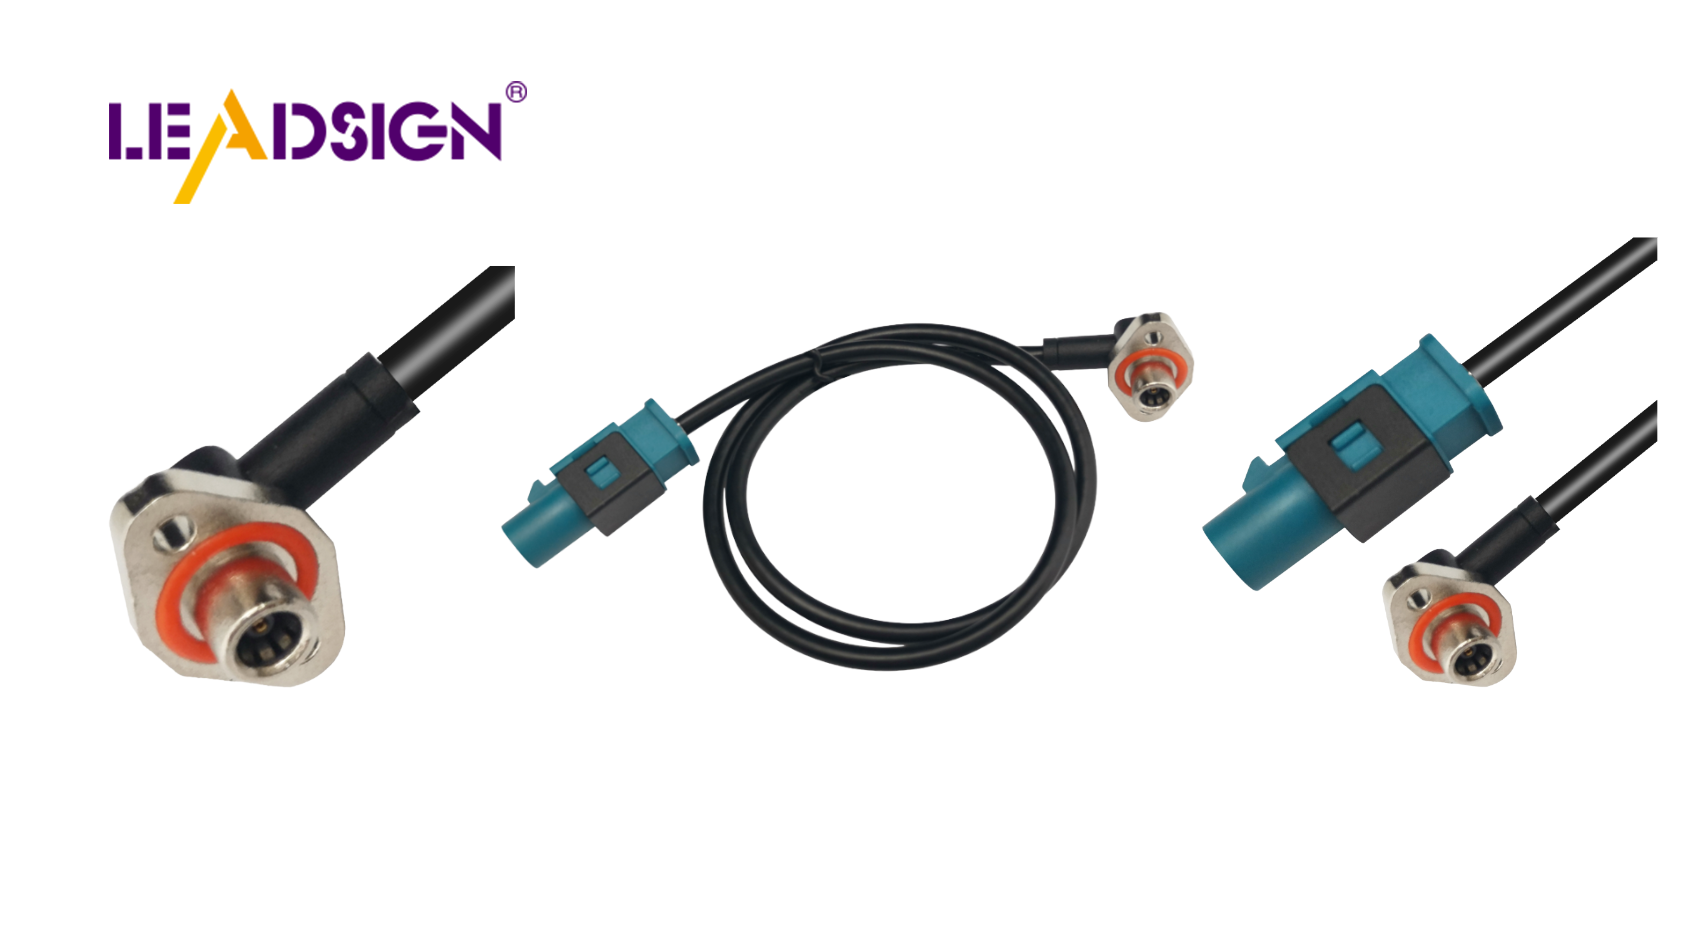
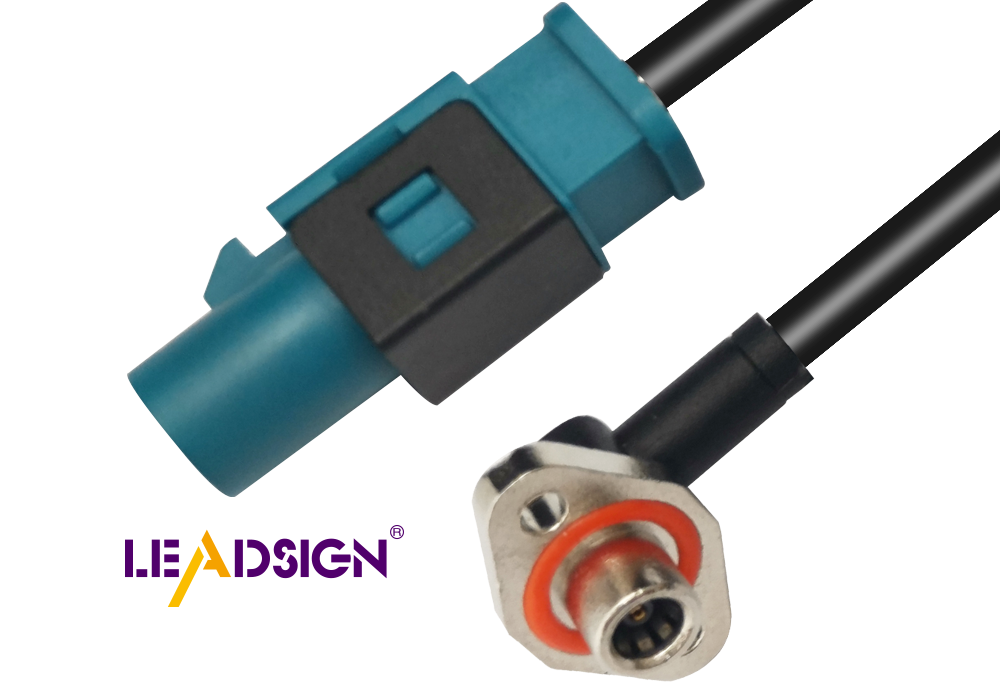
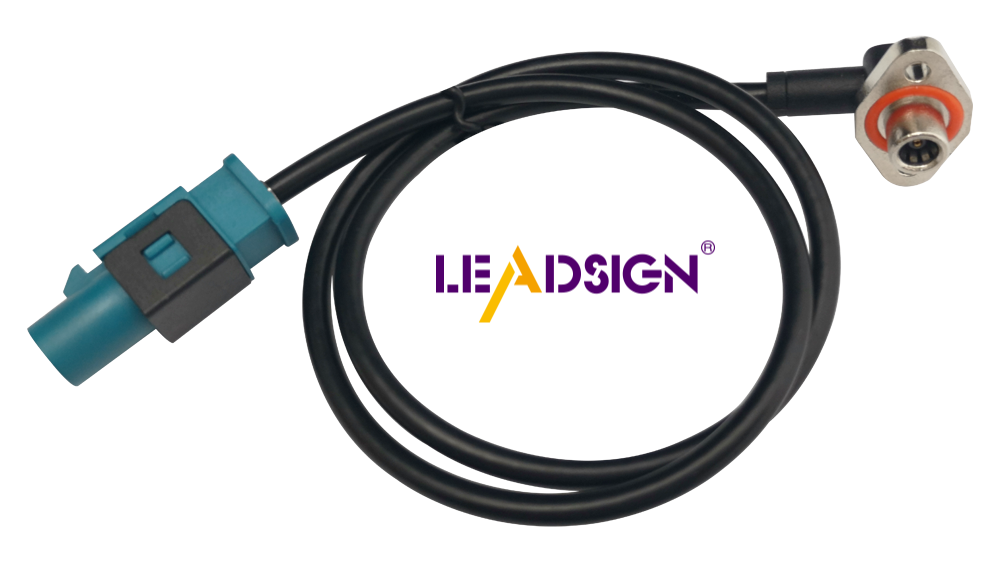
FAKRA connectors for advanced uses
For advanced wiring, FAKRA connectors are a must. They work for GPS, radios, and Bluetooth. They are waterproof and reliable, perfect for modern cars.
"FAKRA connectors meet tough car standards, ensuring strong and precise wiring."
With these tools and supplies, you can handle any wiring project. Start small, practice, and build your skills over time.
Step-by-Step Guide to Wiring
Planning the Wiring Layout
Before wiring, make a clear plan. A good plan avoids mistakes and keeps things simple.
Listing components and their connections
Write down all parts you need to wire, like lights or speakers. Find each part’s power source, ground, and extra connections. Use your car manual or a diagram to see how they connect. This step is important to avoid wiring errors.
"Take your time to understand connections," says a wiring expert. Careful planning now saves trouble later.
Drawing the wiring path
After listing parts, decide where wires will go. Keep wires away from heat and moving parts. Use existing paths or make new ones for neat wiring. Planning ahead prevents mess and makes future changes easier.
Making a DIY Wiring Harness
A wiring harness groups wires together for better organization. Making one yourself lets you customize it for your car.
Grouping wires for neatness
Put wires for similar areas, like lights, in bundles. Use colored wires to tell them apart. This keeps your wiring tidy and helps with fixing problems later.
Securing wires with ties or tape
Tie wires together with zip ties or tape. Zip ties hold wires tightly, and tape adds protection. Attach the harness to the car frame to stop movement. A secure harness lasts longer and stays in good shape.
"Neat wiring shows pride in your work," says a DIYer. It also makes repairs easier later.
Connecting the Parts
Now connect the parts using your wiring harness. Be careful and use the right tools for strong connections.
Stripping, crimping, and soldering wires
Strip the wire ends with a wire stripper. Crimp connectors onto the ends for a tight fit. Solder the wires after crimping for a stronger hold. Soldering keeps connections safe from shaking and heat.
Protecting connections with heat shrink tubing
Slide heat shrink tubing over the wires before soldering. After soldering, heat the tubing to shrink it around the wires. This protects the connection from water and damage.
Testing with a multimeter
Test each connection with a multimeter. Check voltage, resistance, and continuity. This ensures everything works and prevents problems. Testing gives you confidence in your wiring.
"Testing is the most important step," says a wiring expert. It confirms your work is correct and reliable.
By following these steps, you can make a great wiring harness. Start small, practice, and take on harder projects as you learn. With patience and good tools, you’ll become skilled at car wiring.
Common Mistakes to Avoid
Errors in car wiring can cause big problems. Avoiding these mistakes keeps your wiring safe and lasting.
Picking the Wrong Wire Thickness
Using the wrong wire thickness is a common error. Wire thickness decides how much electricity it can handle. A thin wire can overheat, lose power, or even start a fire. For example, amplifiers need thick wires to work safely. But using wires that are too thick adds extra weight.
To choose the right thickness, check how much power your device needs. Longer wires need to be thicker to work well. Keep power loss under 2% at 12 volts for good performance. Use a wire chart or your car manual for help.
"The right wire size makes your devices work better and last longer."
Skipping Wire Protection
Wire protection stops damage and short circuits. Skipping this step can let water, heat, or wear ruin your wires. Over time, unprotected wires can break or stop working.
Use good materials like heat shrink tubing or tape. Heat shrink tubing seals wires tightly, keeping water and vibrations out. Tape adds extra safety and holds wires in place. Always check for bare wires and cover them properly.
"Protecting wires keeps them safe and working longer."
Putting Too Much on One Circuit
Adding too many devices to one circuit is risky. It can blow fuses, melt wires, or cause fires. Each circuit has a power limit. Going over this limit damages wires and parts.
To avoid this, add up the power of all devices on a circuit. Compare it to the circuit’s limit in your car manual. If it’s too much, split devices across circuits. Use a multimeter to check everything is safe.
"Avoiding overloads keeps your car’s wiring safe and working well."
By avoiding these errors, you can make a strong wiring setup. Focus on wire thickness, protection, and circuit limits for a safe and effective project.
Skipping Connection Testing
Not testing your connections can cause big problems in your car. Testing makes sure every wire and part works properly. If you skip it, your car might have issues, become unsafe, or need expensive fixes.
Why Testing is Important
Testing checks if your wiring is done right. It helps find loose wires, wrong setups, or broken parts before they cause trouble. A good electrical system keeps your car safe and reliable. Without testing, circuits might fail or overheat when used.
"Good testing can save money and keep your car running well," says Auto Edge Ltd.
Tools for Testing
You need a few tools to test your wiring:
Multimeter: This tool checks voltage, resistance, and flow of electricity. It ensures wires work as they should.
Test Light: A simple tool to see if power reaches a circuit. It’s quick and easy to use.
Voltage Drop Tester: Finds weak spots by measuring power loss in a circuit.
These tools help you find and fix wiring problems easily.
How to Test Connections
Follow these steps to check your wiring:
Check Flow: Use a multimeter to see if electricity moves through wires. Place the probes on both ends. A beep or low resistance means it’s working.
Measure Voltage: Test voltage at each connection. Compare it to your car manual. Big drops in voltage mean there’s an issue.
Do a Voltage Drop Test: While the circuit is on, measure power loss across wires. High loss shows bad connections or damaged wires.
Test Devices: Turn on connected parts like lights or motors. Make sure they work as expected.
"If you can test a simple circuit, you can handle most 12V systems," says an expert.
Why Testing Helps
Testing saves time and money by avoiding future problems. It ensures your car’s electrical system is safe and works well. Testing improves your car’s performance and prevents dangers.
"A working electrical system is key for car safety and dependability," notes Auto Edge Ltd.
Always test your wiring. It’s a small step that makes a big difference, giving you confidence and keeping your car safe.
Tips for Success
Crimping vs. Soldering: When to Use Each
Knowing when to crimp or solder is very important. Both methods are useful, but the choice depends on your project.
Crimping: Crimping is best for most car wiring jobs. It makes strong, vibration-proof connections when done correctly. Experts say crimped connections are very dependable. For example, spacecraft wiring uses crimping because it handles vibrations well. Use good crimping tools and ensure a tight connection. After crimping, cover it with heat shrink tubing for extra safety.
Soldering: Soldering is better for wires that don’t move much. It joins wires by melting solder, creating a solid bond. But soldered joints can weaken if they face constant movement. If you solder, always use heat shrink tubing to protect the joint from damage.
"A crimped connection is the best choice. Crimp it, then cover with heat shrink tubing," says a wiring expert.
For most car wiring, crimping is safer and lasts longer. Use soldering only for wires that stay still.
Proper Wire Wrapping Techniques
Wrapping wires neatly keeps them safe and easy to manage. It also helps with future repairs.
Group Wires by Purpose: Put wires for similar tasks, like lights, together. This makes fixing problems easier later.
Use Covers or Looms: These protect wires from damage and keep them tidy. They also stop wires from tangling or rubbing on sharp edges.
Secure with Zip Ties: Use zip ties to hold wires in place. Don’t pull them too tight, as this can harm the wire covering.
Avoid Sharp Turns: Keep wires straight or gently curved. Sharp bends can weaken wires and cause breaks.
"Neat wiring looks good and makes repairs easier," says a DIY expert.
By wrapping wires properly, you create a clean and long-lasting setup.
Labeling Wires for Easy Identification
Labeling wires is simple but very helpful. It saves time and effort during repairs or upgrades.
Buy Ready-Made Labels: Stores sell labels made for wires. They are easy to use and last a long time.
Write Clearly: If making your own labels, use a marker and write neatly. Include what the wire does or where it goes.
Use Colored Tubing: Heat shrink tubing in different colors works well. Assign colors to systems, like red for power and black for ground.
Make a Chart: Create a chart matching labels or colors to their jobs. Keep it in your car manual or toolbox for quick reference.
"Labeling wires may seem small, but it’s a big help later," says a car enthusiast.
Labeling wires keeps your setup organized and easy to understand, even years later.
Keeping Your Workspace Clean and Tidy
A neat workspace is key for good car wiring projects. It helps you work faster, avoid mistakes, and stay safe. Staying organized lets you focus better and finish tasks quickly.
Why an Organized Workspace Helps
Work Faster: Finding tools easily saves time. You won’t waste time looking for tape or a wire stripper.
Fewer Mistakes: A clean area reduces the chance of mixing wires or losing small parts.
Stay Safe: A tidy space prevents accidents. Tools or wires on the floor can cause trips or damage.
"A clean workspace shows a clear mind," says a DIY expert.
How to Keep Your Workspace Tidy
Assign Places for Items
Give tools and materials their own spots. Use labeled bins or drawers. For example, keep connectors in one bin and crimpers in another.Use a Proper Table
Work on a strong table with enough room for tools and diagrams. A workbench keeps everything off the floor and within reach.Clean Up as You Work
After each step, put tools away and throw out scraps. This keeps your area clear and stops clutter from piling up.Sort Wires and Parts
Group wires by type using zip ties or containers. Label wires for long projects to avoid confusion. Some people use colored tubing for easy identification.
"Labeling wires and keeping notes saves so much time later," says a DIYer.
Keep Notes Nearby
Store diagrams, part lists, and notes in a folder. Laminating them protects against spills. Keep this folder close for quick access.
Tools to Stay Organized
Toolboxes: Keep all your tools in one place for easy access.
Magnetic Trays: Hold small metal items like screws or connectors.
Cable Organizers: Stop wires from tangling and keep your area neat.
"Using labels and organizers makes every project easier," says a car wiring fan.
By keeping your workspace clean, you set yourself up for success. Start small by cleaning as you go and labeling wires. Over time, these habits will make your projects more fun and efficient.
Learning car wiring is key to doing DIY projects well. Start by understanding the basics and using proper tools. Begin with easy tasks, like wiring a light or making a harness. Keep notes and label wires to help later. Over time, you’ll learn how to upgrade your car’s electrical system. Be patient and focus on details to get great results. Completing your own projects can be fun and rewarding.
FAQ
What wire should I use for car wiring?
Pick wires like GXL, SXL, or TXL. These wires resist heat and work well in cars. GXL wires are great for engines, while TXL wires fit tight spaces. Match the wire type to your project needs.
How do I pick the right wire thickness?
Wire thickness depends on the power needed. Thick wires, like 8-gauge, are for high-power items like amplifiers. Thin wires, like 16-gauge, are for low-power items like LED lights. Check your car manual or a wire chart for help.
What tools are needed for car wiring?
You’ll need wire strippers, crimpers, and a multimeter. Strippers remove insulation without damage. Crimpers attach connectors tightly. A multimeter checks voltage and ensures connections work. Heat guns and soldering irons are helpful too.
How can I protect wire connections?
Use heat shrink tubing and tape to protect wires. Heat shrink seals connections from water and damage. Tape adds extra safety and holds wires in place. Proper protection makes wiring last longer.
What are FAKRA connectors used for?
FAKRA connectors are for GPS, radios, and Bluetooth. They are waterproof and strong, perfect for advanced car wiring. Use them for precise and reliable connections.
How do I read a wiring diagram?
Learn symbols like lines for wires and circles for connections. Start at the power source and follow the circuit step by step. This helps you understand how parts connect and work.
What mistakes should I avoid in car wiring?
Don’t use the wrong wire size or skip insulation. Avoid overloading circuits and always test connections. Thin wires can overheat, and untested wires may fail. Testing ensures everything works safely.
Should I crimp or solder wires?
Crimping is best for most car projects. It makes strong, vibration-proof connections. Use heat shrink tubing for extra safety. Soldering works for wires that don’t move much. Choose based on your project.
How do I keep wiring neat?
Group wires by purpose and secure with zip ties. Use covers to protect wires and label them clearly. Neat wiring looks good and makes repairs easier.
Why is testing wiring important?
Testing ensures wires are safe and working. Use a multimeter to check voltage and connections. Test before finishing to avoid problems. Testing prevents mistakes and keeps your car safe.
See Also
Everything You Need to Know About HSD Connectors
Understanding Fakra HSD LVDS 4 Pin Connector Wiring
Introduction to HSD Connectors for Automotive Applications
Essential Information on Ford Fakra Connectors
Fakra Connectors Explained: Benefits, Uses, and Setup Advice
